Here at Ta-Da! we aim to take the stress out of baking and provide the best ingredients, so you can produce something special. Baking requires accurate measurements, great ingredients, the right cooking temperatures, and good techniques! Although baking can be intimidating to some, we’ve created excellent home baking mixes to make it easy for everyone. If you want to master your baking techniques and become a master baker, we’ve created a guide with some helpful hints and tips from bread to cakes and even the equipment you’ll need.
Bread
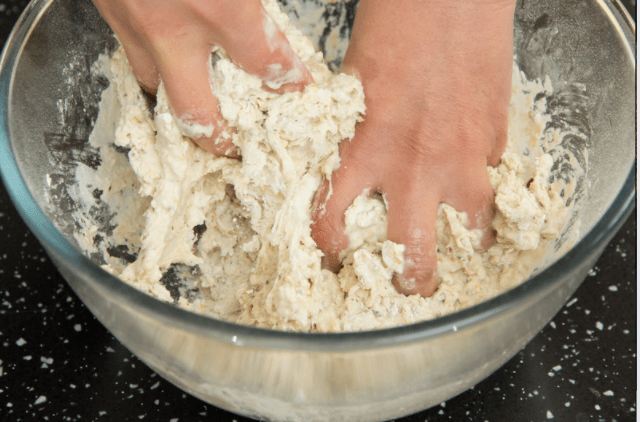
The aim of mixing is simply to incorporate all the ingredients – flour, yeast, salt and water – and form them into a homogeneous dough. Ta-Da! bread mix already contains everything except the water. Mixing ensures all of the ingredients are wet, or hydrated, before starting the kneading step.
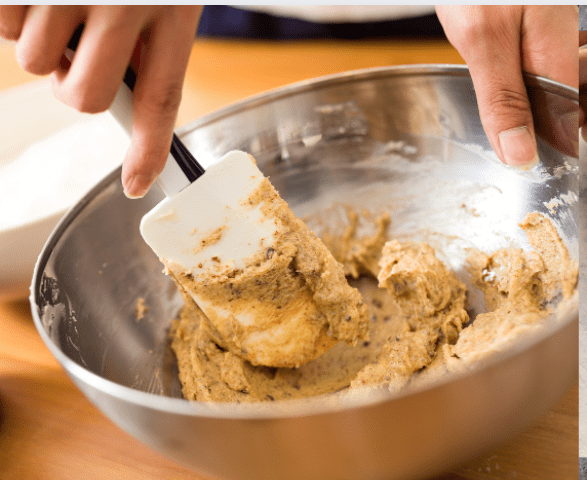
In a mixer, use a slow speed until all the ingredients are incorporated, then increase the speed for the kneading step. If mixing by hand, put all the ingredients in a bowl and get your hands in. The mixture will start off really sticky and messy. As the flour absorbs more water the mixture will become less sticky and easier to handle.
Kneading is where the dough gets ‘developed’. Flour contains proteins that, when properly developed, form gluten. Gluten gives the dough its elastic and extensible properties that allow the dough to rise and maintain a good shape. The kneading action brings the protein molecules together, where they form links to each other. The more links are formed, the more developed the gluten becomes. As the dough is developed, tiny air bubbles are formed and trapped in the gluten network.
Strong bread flour has more protein than plain flour or cake flour, meaning it can form more protein links and result in a better-quality bread. Ta-Da! bread mix contains the same strong bread flour as that used by professional bread bakers.
How to knead dough
Kneading starts during the mixing step and mixing continues into the kneading step!
Some protein links are formed during mixing, and the dough will continue to absorb water during kneading. The transition from one step to the next is gradual, but generally when you can lift the whole dough without it separating, you’re in the kneading step.
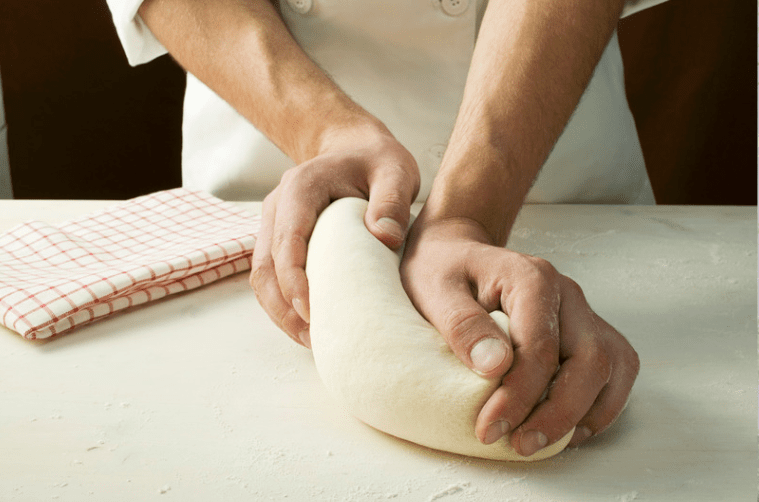
To knead the dough with a mixer, simply increase the speed – this increases the energy put into the dough and helps those protein links to form. Kneading by hand takes a lot of effort and you may find you need to rest frequently – you’re spending energy to develop the gluten.
Repeatedly stretch and fold the dough against your worktop and turn it a little after each repetition. In this way, all the dough gets kneaded equally. The stretching action aligns the protein molecules so that they can form links. The dough may still be a bit sticky during kneading, so you can dust your hands and worktop with flour but do this sparingly; too much flour will make the dough more difficult to handle and will interfere with gluten development. Try to minimise contact with the dough, taking your hands off the dough after each stretch and fold.
You can check dough development by using a simple ‘window’ test. Gently stretch a portion of the dough into a thin sheet. If you can stretch it out thin enough to see through – try reading a magazine or newspaper through the window – without it breaking, the dough is developed.
The dough may be quite tight after kneading, so it’s a good idea to rest it for a few minutes. This allows the dough – and you, after the hard work of kneading – to relax a little before shaping.
Shaping of the dough depends on what kind of texture you want and what shape of bread you are making. The more it is worked, the closer the final texture of the bread will be. A sliced tin loaf will need more work than a baguette or a ciabatta.
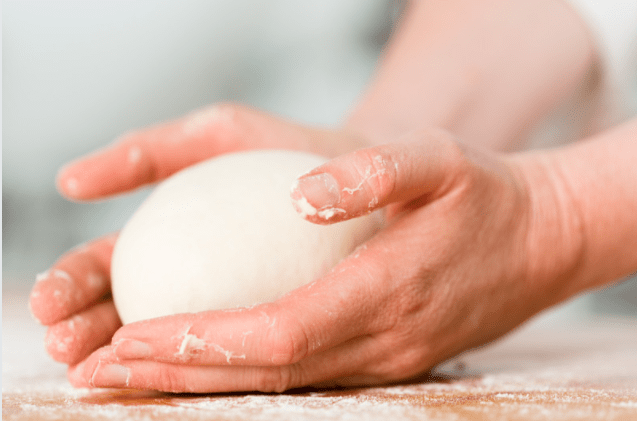
A tin loaf first should be rounded. There are a few ways of doing this; the simplest is to hold the dough in both hands and gently fold the sides underneath until a smooth ball is formed. This builds some tension into the dough surface, which will later help to maintain a good shape. You might need to rest it again for a few minutes before the next stage of shaping.
Next, mould the dough to the approximate shape of your tin. Place the dough smooth side down onto a lightly floured surface and flatten the dough into an oval using your knuckles. Then roll the flattened dough up lengthwise, rolling toward you. Tuck the dough into itself as you go; this will help to maintain a little tension in the outside surface.

The proving step is when the bread rises. The yeast converts starch and sugar into alcohol and carbon dioxide. The alcohol becomes dissolved in the water of the dough, whilst the carbon dioxide is trapped in the bubbles that were made during kneading. As the yeast continues to produce carbon dioxide, the bubbles will inflate and cause the dough to rise. When the dough has doubled in size, it should be ready to bake.
Proving time depends on the conditions, but about an hour is normal. A warm humid environment is best. Yeast works best in warm conditions, and humidity will stop the dough surface from drying out. Try covering the tin with a damp cloth and or covering the dough with lightly oiled cling film.
Scoring
When the bread is ready for baking, it’s a good idea to score it first. This gives the bread a nice appearance and gives a controlled burst of volume. For a tin loaf, use a sharp knife to make a single cut down the length of the loaf, about 2cm deep, or make a series of shallower diagonal cuts. For a baguette, make a series of overlapping cuts and angle the blade horizontally so that it cuts under the dough. For all types, a dusting of flour prevents the blade from sticking.
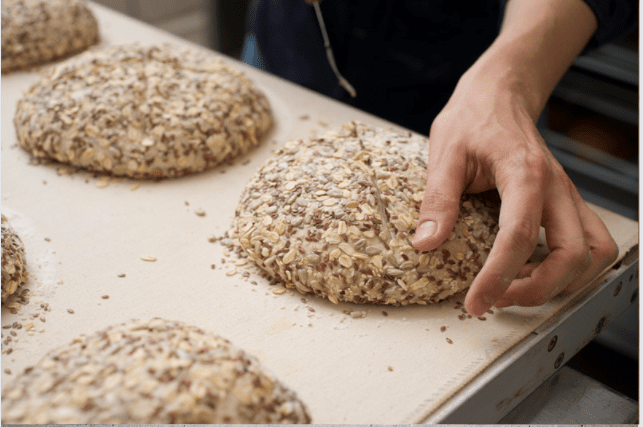
Toppings
Toppings, such as seeds, herbs, fruit, or cheese can be added after shaping or just before baking.
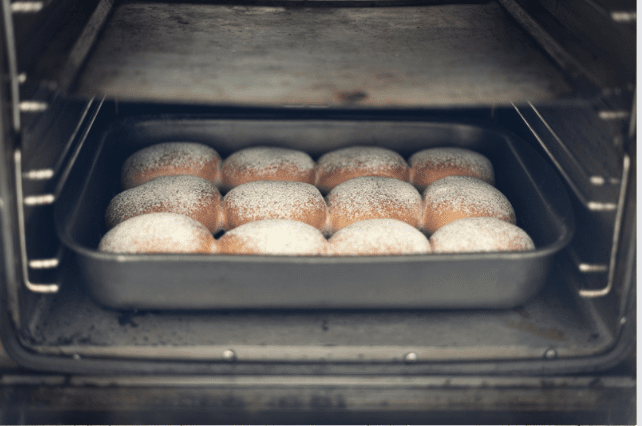
Finally, the bread needs to be baked. Several things happen during baking. First is a final burst of carbon dioxide production before the yeast is killed. Along with a rapid expansion of gases trapped in the dough, this causes the bread to rise. Moisture is driven off, causing the surface to become dry and forming the crust. The alcohol produced by the yeast also escapes now. The wheat starch in the flour turns to a gel – this gel sets the final structure and shape of the bread.
The oven should always be hot; 220 °C to 230 °C / 425 °F to 450 °F / Gas 7 to 8. In general, allow 20 minutes for rolls, 40 minutes for free-standing breads, and 50 minutes for tin breads. After baking, allow the bread to cool on a wire rack.
For a crispy crust, add steam to the oven. The moisture helps the crust to stay soft so it can expand, then later helps to form a thin crispy layer. When the bread is first put in the oven, use a water spray bottle to spray the oven walls. Do this a few times during the first half of baking but work quickly to avoid losing too much heat from the oven – and avoid spraying the lights, fan and elements! Another method is to place an ovenproof metal pan in the bottom of the oven and pour a little water into it at the start of baking.
Cake
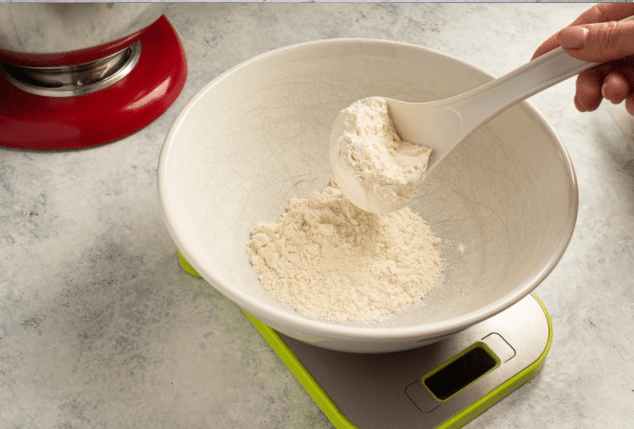
Accurately measuring cake ingredients is fundamental to getting a delicious baked sponge. Using digital scales gives you the most accurate results so opt for digital scales with gram (g) measurements instead of using cup measurements or measuring by eye.
Mixing a cake batter is the most crucial stage of cake making. This is where ingredients are combined to form an emulsion and create the desired characteristics of a light and airy cake. Make sure to follow the mixing stage of your recipe correctly and do not skip a step or rush a stage, especially if creaming fat and sugar together as you want to allow the maximum amount of air to be added during this stage. When adding egg, do so slowly until all the egg is mixed in to ensure the batter does not curdle. After adding the dry ingredients, be careful not to overmix the cake batter, as this can create a tough cake due a loss of air bubbles, or the flour being overworked. Importantly, before mixing, allow all the ingredients to come to room temperature as this will help the ingredients bind together without leaving any lumps or curdling the batter.
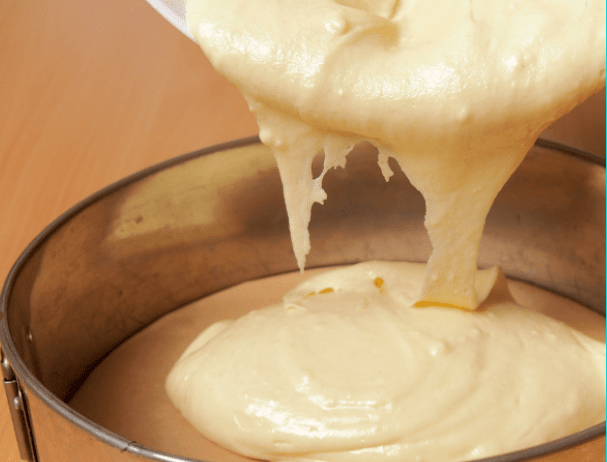
Make sure that the tins you are using are lined with greaseproof liner or fat like oil or butter to help the cake come out of the tin smoothly after baking. When adding your cake batter to the tins, divide the mix evenly (you can even use scales to measure the weight to be certain that your cakes are even). If your batter is thick, spread the mix to the edge of the pan so that it rises evenly in the oven.

Ensure that your oven is preheated to the correct temperature so that your cake bakes evenly within the correct time. Be careful not to bake your cake at too high a temperature, this will bake the outside quicker than the inside resulting in a dark crust and a light / underbaked middle. Place your cake in the centre of the oven to ensure the heat is evenly distributed and to get an even rise.

Only open the oven door to check your cake at the recipe’s stated minimum baking time. Opening the oven any sooner will cause heat to escape, and the cake may collapse if the batter hasn’t had enough time to set. To check whether the cake is baked, insert a long toothpick to the centre and draw it out. If it comes out clean or only a few crumbs, the cake is baked. If there is still wet batter on the toothpick, put the cake back in the oven for a few more minutes and test again until it comes out clean. For more accurate results, insert a digital thermometer to the centre of the cake and if it reads 98 degrees Celsius or over then the cake is ready.
Equipment
This is essentially a square cake tin with straight sides, and for most basic brownie recipes, you’ll want one that’s 22cm by 22cm. A sturdy aluminium one is fine for starting out, but you can graduate to a glass or ceramic one later on.
A loaf tin is what you’ll use for baking quick bread loaves like our White bread or Triple Seed bread.
We recommend investing in a set of stainless-steel bowls that come in various sizes and at least one glass bowl of similar size. Stay away from aluminum, however, because acidic ingredients will react with the metal and change the flavour of your food.
A metal or flexible plastic scraper is good for cleaning your work surface and your hands.
This might be the single most important item on the list, measuring in the ingredients inaccurately is possibly the biggest baking mistake. Get a digital scale that can be set to grams and has a tare function, so you place a bowl on it and then zero it out.
Baking trays are a staple for any baker. They can be metal, tempered glass, ceramic or silicone. If you see yourself as a keen baker you should consider investing in some sturdier trays and pans that will last for many baking years to come.
A good bread knife is a no-brainer for every home. It will help you cut neat slices and save you hacking away at your loving creation. It’s all in the presentation, isn’t it?
An electric stand mixer is expensive, but once you’ve used it a few times, you’ll wonder how you ever got by without it. The standard attachments will include a whip, paddle and dough hook, which is enough to cream butter, mix batter, knead dough, whip egg whites for meringues, and anything else an aspiring baker would want to do.
This is the perfect tool to claim every last bit of dough from your mixing bowl. You can also use it to push your baking creations downwards inside a baking tray of your choice.
It may not be the most exciting piece of equipment your ever buy, but a cooling rack is essential for cooling bread.
General Cake Baking Tips
Have your oven preheated as per recipe, so once the batter is added to the tin/cupcake cases etc, it can be added directly to the oven, without sitting around. Batter sitting around will start to rise on its own, you want this to happen with bread, but with cake you want that to happen in the oven.
Bake in the centre of the oven, try to avoid opening and closing the oven too much, just toward the end of the bake to check, then add it back if required for the remaining 5 minutes
Parchment liners are the ultimate way of ensuring no sticking to the surfaces of the cake. Reusable/washable parchments are widely available which are more sustainable, or just greaseproof paper. If not available, a generous brush of melted butter or oil is required.
If using an intricate Bundt or similar tin, a good application of melted butter or oil is key to ensuring the cake does not stick. Allow to cool in the tin for 30 mins before removing, as the sponge will be more robust and less likely to break, it will also shrink slightly on cooling and pull itself away from the tin edges.
The larger the cake, the lower and slower the bake. Especially fruit cakes. The smaller the cake, or cupcakes and muffins, a higher temperature and shorter bake will encourage a cracked/peaked appearance
The last part of a cake to bake is just below the surface of the centre of the cake
By touch – a gentle touch to the centre top of the sponge should spring back. Using a clean knife or skewer – insert to the centre of the sponge about half way down the cake – remove, if clean and no wet cake batter residue, then the cake is baked through
First, make sure that all ingredients are added to the cake mix. Without the functional ingredients, a cake can have a completely different outcome. Baking powder will make a cake rise by releasing carbon dioxide in the batter which creates air pockets in the cake. Without baking powder a cake can be very dense and lacks height. If your recipe calls for you to cream butter and sugar together until light and fluffy, then add eggs slowly, make sure that the butter and egg are at room temperature.
This will allow the ingredients to bond together more easily and form an emulsion which will trap air bubbles when mixing. These air bubbles will expand during baking and result in a light and tender cake. And do not open the oven during baking until the cake is nearly done as the cool air entering the oven can cause the cake to collapse.
Once cool, cakes can be wrapped in clingfilm or airtight containers and stored frozen. They will confidently store frozen for 6 months, if airtight, and once defrosted may even appear more moist than when they were baked fresh. The key is making sure they are wrapped and stored as airtight as possible, and they are left to cool properly before freezing.
In 5 second bursts in the microwave, stirring in between, making sure no water (wet spoon etc) is added to the melted chocolate as this will cause the emulsion to split.
In a Bain Marie, (glass or other heat proof bowl over a simmering saucepan of water – making sure the water does not touch the bottom of the bowl.
General Bread Baking Tips
There’s no right or wrong way to bake bread! But here are a few tips to help you make your perfect loaf:
- Use good quality breadmaking flour, normally marketed as strong flour or bread flour. Bread flour contains the right amount of protein to form the gluten network that traps the gases produced by the yeast, ensuring a good volume and light fluffy crumb. TaDa! bread mixes are made with bread flour.
- Use lukewarm water to mix the dough – 25C is about right. If you don’t have a thermometer you can check the water temperature by hand – put your hand in the water: if it feels neither warm nor cold on your skin, the temperature is about right.
- After your dough is proved, be sure to slash it with a sharp knife. The bread will rise a bit more in the oven and slashing can help it to expand without tearing. Make a single slash along the top of a tin loaf, or a series of diagonal slashes along a baguette or bloomer.
- For a crispy crust, add steam to the oven. The moisture helps the crust to stay soft so it can expand, then later helps to form a thin crispy layer. When the bread is first put in the oven, use a water spray bottle to spray the oven walls. Do this a few times during the first half of baking but work quickly to avoid losing too much heat from the oven – and avoid spraying the lights, fan and elements! Some ovens have a steam setting that can take care of this for you.
Bake in the centre of the oven, try to avoid opening and closing the oven too much, just toward the end of the bake to check, then add it back if required for the remaining 5 minutes
If you are following a recipe, ensure that your oven is set to the required temperature, that it’s hot enough before the proved dough is placed into the oven, and bake for the correct amount of time.
A handy way to check if the bread is baked through is to turn it upside-down, check that the bottom has a golden colour, and flick the bottom of the bread – if it sounds hollow, the bread is baked. If not, place it back in the oven for a further 5 to 10 minutes.
If using an intricate Bundt or similar tin, a good application of melted butter or oil is key to ensuring the cake does not stick. Allow to cool in the tin for 30 mins before removing, as the sponge will be more robust and less likely to break, it will also shrink slightly on cooling and pull itself away from the tin edges.
Baking time depends on the recipe, the size of the bread, and the oven temperature. Temperature for bread should always be hot – 220 to 230 C / 425 to 450 F / Gas 7 to 8. In general, allow 20 minutes for rolls, 40 minutes for free-standing breads, and 50 minutes for tin breads.
The dough should be kneaded until it is fully developed – meaning until the dough becomes elastic so that it resists being stretched but doesn’t break. This elastic property enables the dough to retain the gas produced by the yeast and produces a light bread with plenty of volume.
When the dough is perfectly kneaded, you should be able to stretch it out into a thin continuous sheet that you can read a newspaper through. Kneading dough is a difficult skill to master by hand, but is a very rewarding aspect of baking bread. If using a food mixer, you can check the dough every few minutes and simply continue mixing until it is ready.
Some modern domestic ovens have a prover setting that will take care of this. For everyone else, the bread needs to be kept warm and moist. The warmth enables the yeast to produce gas which causes the dough to rise, and the moisture prevents the crust from drying out. Cover it with an oiled sheet of cling film or a damp cloth and place it somewhere warm. For tin bread, an ideal place is the top of a radiator.
Proving time can vary depending on the temperature, but a good rule is to prove until the dough has doubled in size. 1 to 2 hours is normally long enough.
Yes, but it will go stale really quickly afterwards so it should be eaten the same day. When bread is heated it drives off moisture, making it dry and brittle. On the other hand, stale bread is great for toasting. Just make sure it isn’t mouldy.